
Close Grip Pulldown: 7 Proven Fixes for Better Results
MyFitnessCoach
September 18, 2023
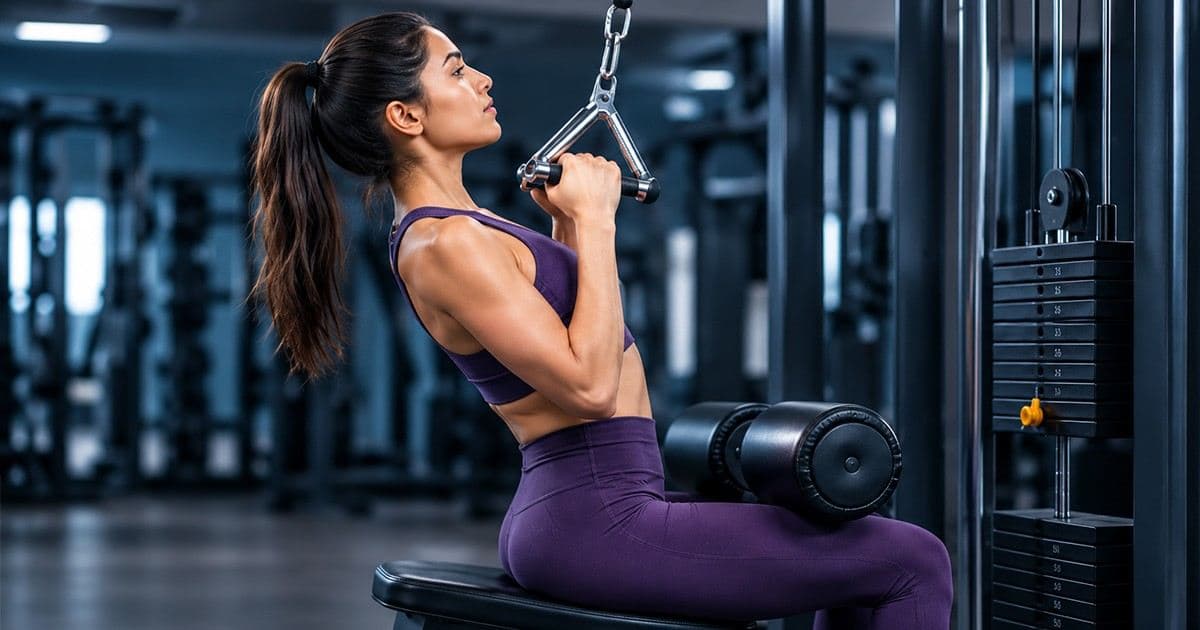
The close grip pulldown is a cable machine exercise where you pull a narrow attachment down toward your upper chest with your hands positioned close together, usually shoulder-width or narrower. It trains the latissimus dorsi as the primary mover, with support from the rhomboids, trapezius, teres major, and biceps.
People use it for two practical reasons: the narrow hand position tends to feel more comfortable on the shoulders and wrists than a wide grip, and it allows a longer pulling range through the shoulder joint. It is also one of the more approachable back exercises for anyone who cannot yet perform pull-ups.
This guide covers correct setup and execution, what grip width genuinely changes and what it doesn't, how to fix the exercise when you feel it everywhere except your back, and how to progress it over time.

Table of Contents
Subscribe to our newslettter
What Is a Close Grip Pulldown?
The close grip pulldown is a vertical pulling exercise performed seated at a lat pulldown machine using a narrow attachment most commonly a V-bar with a neutral grip, though a straight bar held narrow also works. You pull the handle down to roughly upper-chest or chin height, then control it back to full arm extension.
It belongs to the same family as the standard lat pulldown. The only variable that changes is hand position, and as this guide covers below, that variable matters less than most gym advice suggests.
Muscles Worked in a Close Grip Pulldown
Primary mover
Latissimus dorsi. The large fan-shaped muscle running from your lower back up to your upper arm. It performs shoulder adduction and extension, which is exactly what happens when you drive your elbows down and back.
Assisting muscles
Teres major. Works alongside the lats through nearly the same movement pattern.
Rhomboids and middle trapezius. Retract and stabilize the shoulder blades throughout the rep.
Lower trapezius. Depresses the scapula at the start of each pull the part most people skip.
Biceps brachii and brachialis. Flex the elbow. They are meant to assist, not lead.
Rear deltoids. Contribute to the pulling phase and help stabilize the shoulder.
Core. Works isometrically to keep your torso from swinging.
Close Grip vs Wide Grip: What the Research Actually Shows
This is where most guides on this exercise get it wrong, so it is worth being precise.
The standard claim is that a close grip builds back thickness while a wide grip builds back width. It gets repeated constantly. The problem is that electromyography (EMG) research has not found strong support for it.
A 2014 study in the Journal of Strength and Conditioning Research compared narrow, medium, and wide pronated grips at 6RM loads and found similar EMG activation of the latissimus dorsi, trapezius, and infraspinatus across all three widths. A small difference appeared in the eccentric phase favoring the wide grip, but the effect size was minimal. A more recent EMG analysis of seven lat pulldown variants, differing in grip type, width, and trunk angle, found no statistically significant difference in muscle activation across variations. The only significant finding involved the posterior deltoid at a 30-degree trunk lean, not the lats.
Earlier work by Lusk and colleagues found something slightly different but still not about width: a pronated (overhand) grip produced modestly greater lat activation than a supinated (underhand) grip, while grip width again showed no meaningful effect.
Two important caveats before you rewrite your program around this:
EMG measures activation, not growth. Muscle activation during a set is a short-term signal. It is a reasonable proxy, but it is not the same thing as long-term hypertrophy, which depends on training volume, load progression, and consistency over months. No EMG study can tell you which grip builds more muscle over a year.
Individual variation is real. The recent multi-variant study specifically noted variability between participants in activation patterns, which is why its authors argued for individualized exercise selection rather than a single "optimal" grip.
The practical takeaway: grip width is unlikely to be the lever that determines your back development. Pick the grip that lets you train hard and comfortably with good technique, and vary it if you enjoy the variation not because one version secretly targets a different region of the same muscle.
The Real Advantage of a Close Grip (That Most Guides Miss)
There is one grip-width difference that research does support, and almost nobody mentions it.
In that same 2014 study, participants lifted meaningfully heavier loads with narrow and medium grips than with a wide grip at 6RM. The narrow grip averaged roughly 80 kg, the medium grip about the same, and the wide grip around 77 kg, a small but statistically significant gap.
That matters more than it sounds. If a narrower grip lets you handle more load at the same effort level, and mechanical tension is a primary driver of muscle growth, the close grip gives you a slightly better environment for progressive overload. Not because it targets a different part of your lats, but because it lets you train with more weight.
Combine that with the fact that most lifters find a neutral V-bar grip easier on the shoulders and wrists, and the close grip pulldown becomes a sensible default rather than a specialty variation.
Which Attachment Should You Use?
V-bar (neutral grip)
Palms face each other. This is the most common setup and generally the most shoulder-friendly, since the neutral position avoids forcing the shoulder into end-range rotation. It mimics the hand position of a neutral-grip pull-up, which makes it useful if you're working toward that.
Best for: most people, most of the time especially anyone with shoulder or wrist discomfort on other variations.
Straight bar, narrow overhand
Hands roughly shoulder-width apart, palms facing away. Slightly more lat-dominant based on the pronated-vs-supinated EMG findings, and it keeps the movement closer to a standard pulldown pattern.
Best for: lifters who want a close grip without changing attachments between sets.
Straight bar, narrow underhand
Palms facing you, hands close. This shifts noticeably more work to the biceps and is effectively the reverse grip lat pulldown, which deserves treatment as its own movement.
Best for: building pull-up and chin-up strength, or when you want deliberate arm involvement.
How to Do a Close Grip Pulldown (Step by Step)
- Set the thigh pads. Adjust them so they sit snugly on top of your thighs when seated. Loose pads let you lift off the seat under heavier loads.
- Attach the handle and select your weight. Start lighter than you think you need for the first set.
- Take your grip standing, then sit. Reach up, grab the attachment, and sit down under control rather than stretching for it from a seated position.
- Set your torso. Chest up, ribs down, a slight backward lean of roughly 10 to 20 degrees. Arms fully extended overhead, shoulders allowed to rise slightly at the top.
- Depress your shoulder blades first. Before your elbows bend, pull your shoulder blades down. This single cue does more for lat engagement than anything else on this list.
- Drive your elbows down toward your hips. Not backward, not out to the sides. Think about pushing your elbows into your back pockets. Exhale through this phase.
- Stop when your elbows reach your torso. The handle will be somewhere between chin and upper chest depending on your proportions.
- Pause briefly. A half-second at the bottom keeps you honest about controlling the weight.
- Return under control. Take two to three seconds to let the handle rise until your arms are fully extended again. Do not let it snap back.
- Repeat. Three to four sets of 8 to 12 reps suits most general strength and muscle-building goals.
Range of Motion: How Far Down Should You Actually Pull?
"Pull it to your chest" is the standard cue, and for many people it works fine. But it is a poor universal instruction, because how far the handle travels depends on your arm length, torso length, and shoulder mobility, not on willpower.
Here is a better rule: pull until your elbows reach the sides of your torso, then stop. Once your elbows pass your ribcage, your lats have finished their job. Anything further comes from your shoulders rolling forward or your lower back arching, neither of which adds anything useful.
If you cannot bring the handle anywhere near chin height without leaning way back, that is usually a load problem rather than a mobility problem. Drop the weight and reassess.
At the top of the rep, let your shoulders rise into a full stretch. Shortening the top of the movement is far more common than shortening the bottom, and it costs you the range where the lats are under useful tension.
Common Mistakes and How to Fix Them
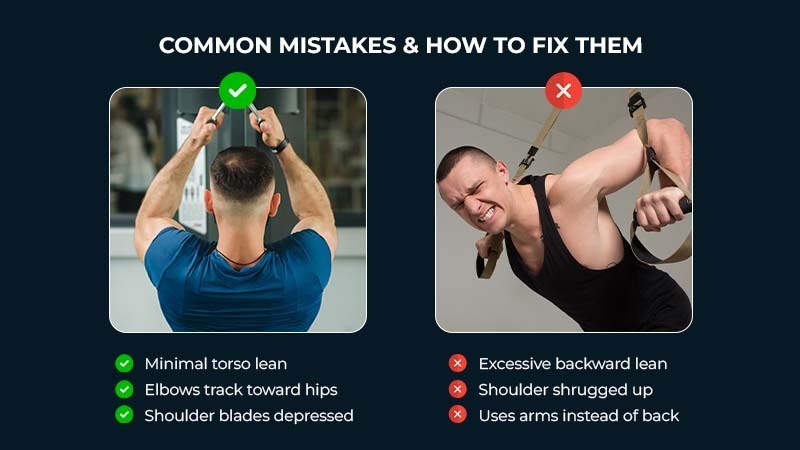
- Leaning back too far. A slight lean is fine and normal. Once you're at 45 degrees, you've turned a pulldown into a row and recruited your lower back to help. Fix: reduce the weight and cap your lean at roughly 20 degrees.
- Pulling with your arms. If the movement starts at your elbows, your biceps lead and your lats follow. Fix: depress the shoulder blades before bending the elbows, every rep.
- Shrugging at the bottom. Shoulders rising toward your ears during the pull means the upper traps are taking over. Fix: actively think "shoulders down and away from ears" through the whole rep.
- Letting the weight yank you up. Releasing without control removes the eccentric portion, which is a substantial part of the training stimulus. Fix: count two to three seconds on the way up.
- Using too much weight. The most common cause of all of the above. Fix: pick a load you can control for all prescribed reps with the last two or three feeling genuinely hard.
- Holding your breath. Fix: exhale as you pull down, inhale as the handle rises.
Troubleshooting: Why You Feel It in the Wrong Place
This is the part most guides skip. If your close grip pulldown isn't working, one of these is usually why.
| Problem | Likely Cause | What to Try |
| You only feel it in your biceps | Movement starts at the elbow instead of the shoulder blade | Depress your scapula before the elbows bend. Drop the weight 20% and do two sets focusing only on that cue. |
| Forearms and grip fail before your back | Grip strength is the limiting factor, not your lats | Use lifting straps on your heaviest sets, or train grip separately. Straps are a tool, not cheating. |
| You can't get the handle to chin height | Load is too heavy, or you're fighting for range you don't have | Reduce weight first. If range is still short at a light load, stop where your elbows meet your torso. That's your range. |
| Pinching or discomfort at the front of the shoulder | Shoulders rolling forward at the top, or grip too narrow for your structure | Switch to a neutral V-bar, keep your chest up at the top, and widen the grip slightly. |
| Lower back arches or you lift off the seat | Thigh pads too loose, or load too heavy | Tighten the pads, brace your core, lower the weight. |
| You feel almost nothing anywhere | Range of motion is too short, or the pace is too fast | Use a full stretch at the top, a controlled three-second return, and pause briefly at the bottom of each rep. |
If the biceps issue persists after a few sessions, spend a few weeks on the straight-arm pulldown first. Because the elbows stay nearly locked, it removes the arms from the equation and is one of the more effective ways to learn what lat engagement actually feels like.
Sets, Reps, and Where It Fits in Your Back Workout
For general strength and muscle building, 3 to 4 sets of 8 to 12 reps with 60 to 90 seconds of rest is a reliable default.
If your main goal is strength, 4 to 6 reps with heavier loads and longer rest works. If you're chasing muscular endurance, 12 to 15 reps with shorter rest is reasonable. Most people don't need to overthink this.
Placement matters more than rep range. Put the close grip pulldown early in your back session, after any free-weight rows or deadlifts if you're doing them, while you're still fresh enough to control the load. Buried at the end of a long session, it becomes an arm exercise.
Two back sessions per week hitting this movement once or twice is plenty for most people. It pairs well with a horizontal pull like the Pendlay row for balanced back development, since vertical and horizontal pulling emphasize the back differently.
How to Progress the Close Grip Pulldown
Adding weight whenever you feel strong is not a progression system. Here is a simple one that works.
Step 1 — Technique first. Do not add weight until you can complete every prescribed rep with controlled tempo and no torso swing. If your last set looks different from your first, you're not ready.
Step 2 — Fill the rep range. Working in 8 to 12 reps, stay at your current load until you can hit 12 clean reps on every set.
Step 3 — Make the smallest possible jump. Increase by one plate on the stack usually 5 to 10 lb. Your reps will drop back toward 8. That's the point.
Step 4 — Repeat.
Worked example:
- Week 1: 100 lb × 8, 8, 7
- Week 3: 100 lb × 11, 10, 10
- Week 5: 100 lb × 12, 12, 12 → time to increase
- Week 6: 110 lb × 9, 8, 8
- Week 9: 110 lb × 12, 12, 12 → increase again
That's roughly 20 lb in nine weeks, which is unremarkable week to week and substantial over a year. Progress on this movement is rarely fast, and stalls are normal if you stall for three weeks, keep the weight and work on adding a second of eccentric control instead.
Tracking is what makes this work, because you cannot progress what you don't record. Logging sets, reps, and loads in MyFitnessCoach removes the guesswork about whether you're actually moving forward or just training hard.
Variations and Alternatives
Single-arm pulldown. One D-handle, one side at a time. Useful for addressing strength differences between sides and for a slightly longer range of motion.
Reverse grip lat pulldown. Narrow underhand grip. More bicep involvement and strong carryover to chin-ups.
Straight-arm pulldown. Elbows stay extended, isolating the lats with minimal arm contribution. Excellent for learning about lat engagement.
Neutral-grip pull-up. The bodyweight equivalent of the close grip pulldown. If your goal is pull-up strength, this is what you're building toward.
Cable pullover. Longer range of motion under stretch, lighter loads.
For a broader view of how these fit together, the guide to back cable workouts covers how to structure a full session around them.
Is the Close Grip Pulldown Right for You?
It's a strong fit if:
- You're building toward your first pull-up
- Wide-grip pulldowns bother your shoulders or wrists
- You want a vertical pull you can load progressively and measure easily
- You're newer to training and want a movement that's straightforward to learn
Consider something else if:
- You can already do sets of 10+ strict pull-ups weighted pull-ups will give you more
- You have an active shoulder injury, in which case get it assessed before adding loaded overhead pulling
- Your gym has no cable machine, though a resistance band anchored overhead is a workable substitute
The Bottom Line
The close grip pulldown is a solid, learnable vertical pull that trains your lats through a comfortable range with a grip most people tolerate well. What it isn't is a specialized tool for building a specific region of your back.
The evidence doesn't support that framing, and treating grip width as the deciding variable in your back development will distract you from the things that actually matter: controlled technique, a full range of motion, and consistent progressive overload over months.
Get the setup right, drive your elbows down rather than pulling with your arms, and add weight in small increments once you've earned it.
This article is for informational purposes only and is not a substitute for professional medical advice, diagnosis, or treatment. Consult a qualified healthcare provider before beginning a new exercise program, particularly if you have an existing injury.
Frequently Asked Questions
Similar Articles
Stay informed with these similar articles.

MyFitnessCoach
May 9, 2025
Why Kneecaps Sweat? 5 Surprising Causes & Proven Fixes
Ever noticed your knees getting sweaty for no reason? You're not alone. Sweaty kneecaps might seem odd, but they're more common than you think.
MyFitnessCoach
March 6, 2025
Arm Swing Exercise: Effective Way to Boost Your Fitness
When it comes to fitness, we often think of intense workouts, heavy lifting, or long runs. But what if I told you that a simple exercise like arm swings could be just as effective in improving your overall fitness? Arm swing exercises are easy to do, require no equipment, and can be done anywhere. Whether you're a beginner or a fitness enthusiast, arm swings can help you improve flexibility, strength, and even cardiovascular health. In this article, we’ll explore the benefits of arm swing exercises, how to do them correctly, and how you can incorporate them into your fitness routine using the MyFitnessCoach app.
MyFitnessCoach
February 24, 2025
Best Deodorant for Athletes: Stay Fresh During Your Workouts
When you're an athlete or someone who loves to stay active, staying fresh and odor-free is a top priority. Whether you're hitting the gym, running a marathon, or sweating it out during a high-intensity workout, the right deodorant can make all the difference. But with so many options available, how do you choose the best deodorant for athletes? In this article, we’ll break down everything you need to know about finding the perfect deodorant to keep you feeling confident and fresh, no matter how intense your workout gets. Plus, we’ll show you how the MyFitnessCoach app can help you stay on top of your fitness game.